Choose a setup method
Omi supports four setup paths:
OAuth and MCP keys grant access to the same hosted endpoint. OAuth is the default for the
new cloud-connector UI; manual MCP keys remain available as a fallback.
Connect from the Omi macOS app (Recommended)
On the Omi home screen, find Use omi memory anywhere, choose a destination, and follow the connection card:- ChatGPT: choose ChatGPT / Codex, then add Omi from its approved ChatGPT listing. ChatGPT opens Omi’s OAuth consent flow; you do not need to create or paste a key.
- Claude: choose Claude / Claude Code, then Claude (cloud). Omi opens Claude’s custom-connector flow with the registered public OAuth client.
- Claude Code, Codex, OpenClaw, and Hermes: Omi generates an MCP connection key and offers guided local setup. Expand Manual installation to copy the server URL, key, command, or configuration yourself.
- ChatGPT custom app: expand Developer-mode fallback only if your workspace cannot use the approved directory listing.
Hosted Server with OAuth
Use the hosted server URL as the remote MCP URL:2026-07-28; older protocol
versions remain supported) and advertises OAuth metadata at:
https://api.omi.me/v1/mcp/sse is a permanent compatibility alias of the same
endpoint (older configs and OAuth metadata keep working). New setups should
always use the canonical /v1/mcp URL above.client_id URL (PKCE); dynamic client
registration is not offered. Omitting the scope parameter grants all
available read scopes — writes are never included by default.
- ChatGPT
- Claude
The preferred path is Omi → Use omi memory anywhere → ChatGPT / Codex → ChatGPT
(cloud). Add Omi from the directory page and approve the OAuth consent screen.For the advanced developer-mode fallback, use:
- Connection / server URL:
https://api.omi.me/v1/mcp - Authentication: OAuth
- OAuth Client ID:
omi-chatgpt-prod - OAuth Client Secret: leave blank
- Token auth method:
none - Authorization URL:
https://api.omi.me/authorize - Token URL:
https://api.omi.me/token
Manual MCP-key fallback
Use a manual key for clients that support a bearer header but cannot use Omi’s registered OAuth flows.Find or create an MCP key
In the current macOS UI, open Use omi memory anywhere, choose Claude Code, Codex,
OpenClaw, or Hermes, and expand Manual installation. Omi generates the connection
key and shows a masked Your key row with a Copy button.You can also use the cross-platform Omi app: open Settings → Developer Settings,
scroll to MCP Server, and create a key in its API Keys list. The complete
omi_mcp_... value is shown only when it is created, so copy and store it then.Your key will look like: omi_mcp_...MCP keys are distinct from Developer API keys. An
omi_mcp_... key authenticates the
hosted MCP endpoint and /v1/mcp/... REST routes. An omi_dev_... key authenticates
/v1/dev/... routes and will not authenticate MCP.Configure Your Client
Use the following connection details:
- Server URL:
https://api.omi.me/v1/mcp - Authorization:
Bearer omi_mcp_...(your generated key) - Transport: Streamable HTTP (MCP
2026-07-28; older protocol versions supported)
Manual hosted-client configuration
- Claude Desktop
- Claude Code
- Cursor
- Codex
- OpenCode
- Poke
- OpenClaw / Hermes
- Custom Client
Claude Desktop adds remote MCP servers through the Connectors UI — not a
config file. Open Settings → Connectors → Add custom connector, then use:
- Name: Omi Memory
- Remote MCP server URL:
https://api.omi.me/v1/mcp - Advanced settings (only if asked): OAuth Client ID
omi-claude-prod, OAuth Client Secret leave blank
claude_desktop_config.json only launches local stdio command servers — it
cannot hold a hosted HTTP entry. For a manual-key local path use the
deprecated local stdio fallback.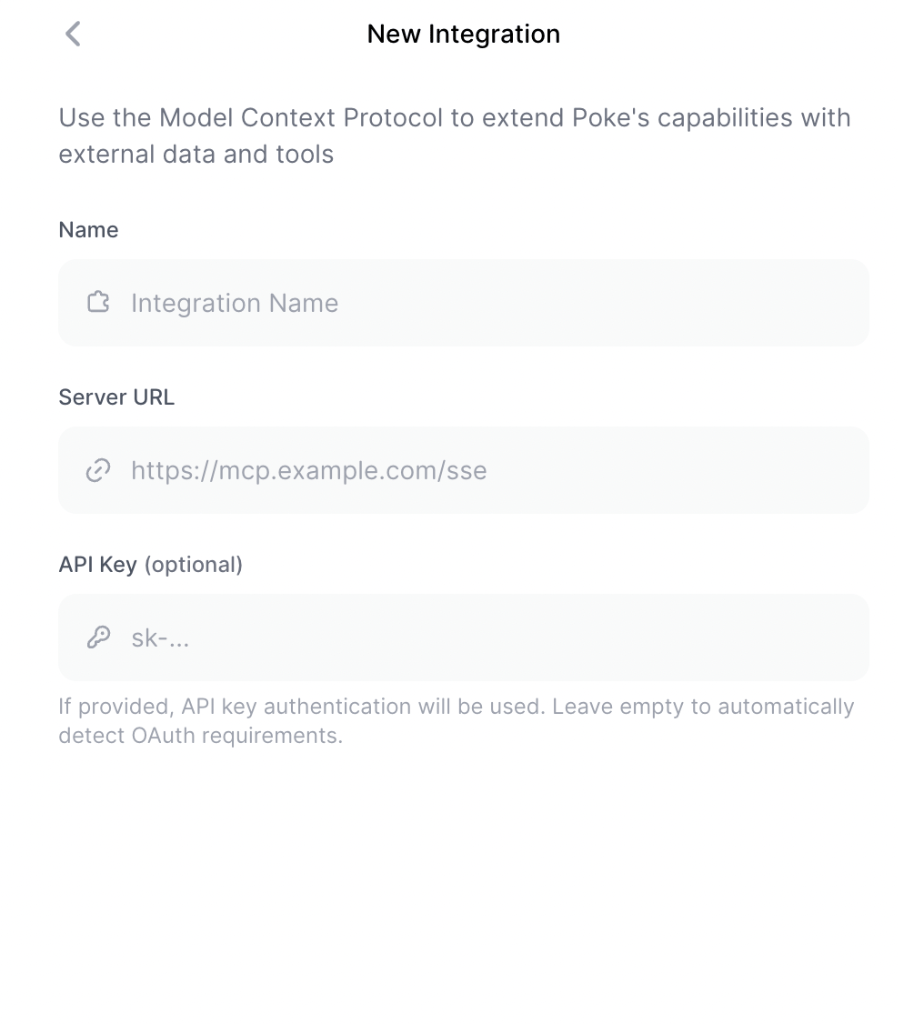
Local stdio server with uvx or Python (deprecated)
Run the MCP server locally over the standard input/output transport.uvx (which
ships with uv) downloads and runs the published
package without a separate installation. Python 3.11.6 or newer is required.
- uvx
- Python
Add this to your MCP client’s local-server configuration:Install uv first. The
OMI_API_KEY value can also be supplied with each tool call.Generate the MCP key using either location in Manual MCP-key fallback.
Developer API keys that start with
omi_dev_ will not authenticate MCP requests.Local stdio server with Docker (deprecated)
Migration-only, like the uvx path above — prefer the hosted endpoint. If you must run the MCP server locally:Generate an API Key
Generate an MCP key using either location in
Manual MCP-key fallback.
Install Docker
Install Docker. We recommend OrbStack for macOS.
Configure Claude Desktop
Add to your
claude_desktop_config.json:OMI_API_KEY environment variable:
Custom Backend URL
Only applies to the localmcp-server-omi package above when self-hosting
the Omi backend. The package appends REST segments (memories,
conversations/...) directly, so the value must end with /v1/mcp/:
This is the REST base for the self-hosted package — distinct from the
hosted MCP endpoint remote clients connect to (
https://api.omi.me/v1/mcp,
no trailing slash). Only needed for self-hosted Omi instances.